# SDK for WeChat Mini Program
GitHub source code address: https://github.com/Authing/authing-wxapp-sdk (opens new window)
The Authing applet SDK (authing-wxapp-sdk) is suitable for use in the WeChat applet environment, based on authing-js-sdk (opens new window), right The WeChat applet environment has been adapted. You can use all the methods in authing-js-sdk AuthenticationClient (opens new window), such as obtaining and modifying user information, Add user-defined fields, etc. At the same time, it is specially used in the mini-program environment obtaining the user's mobile phone number through WeChat authorization, logging in with WeChat authorization, logging in with WeChat authorized mobile phone number, etc.
- Configure Mini Program Login in Authing
- Install
- Initialization
- How to use
- API Reference
- Best Practice
- Error handling
- Get help
# Configure Mini Program Login in Authing
In order to use the Authing applet SDK in the applet, you need to apply for an applet in WeChat Open Platform (opens new window) and at the same time in [Authing Console](https:/ /console.authing.cn/console/userpool) fill in the configuration of the applet.
Configure Mini Program Login
- First go to WeChat Open Platform (opens new window) to register a WeChat Mini Program development account
- **If you need to get the user's mobile phone number, you need to pass WeChat authentication. **
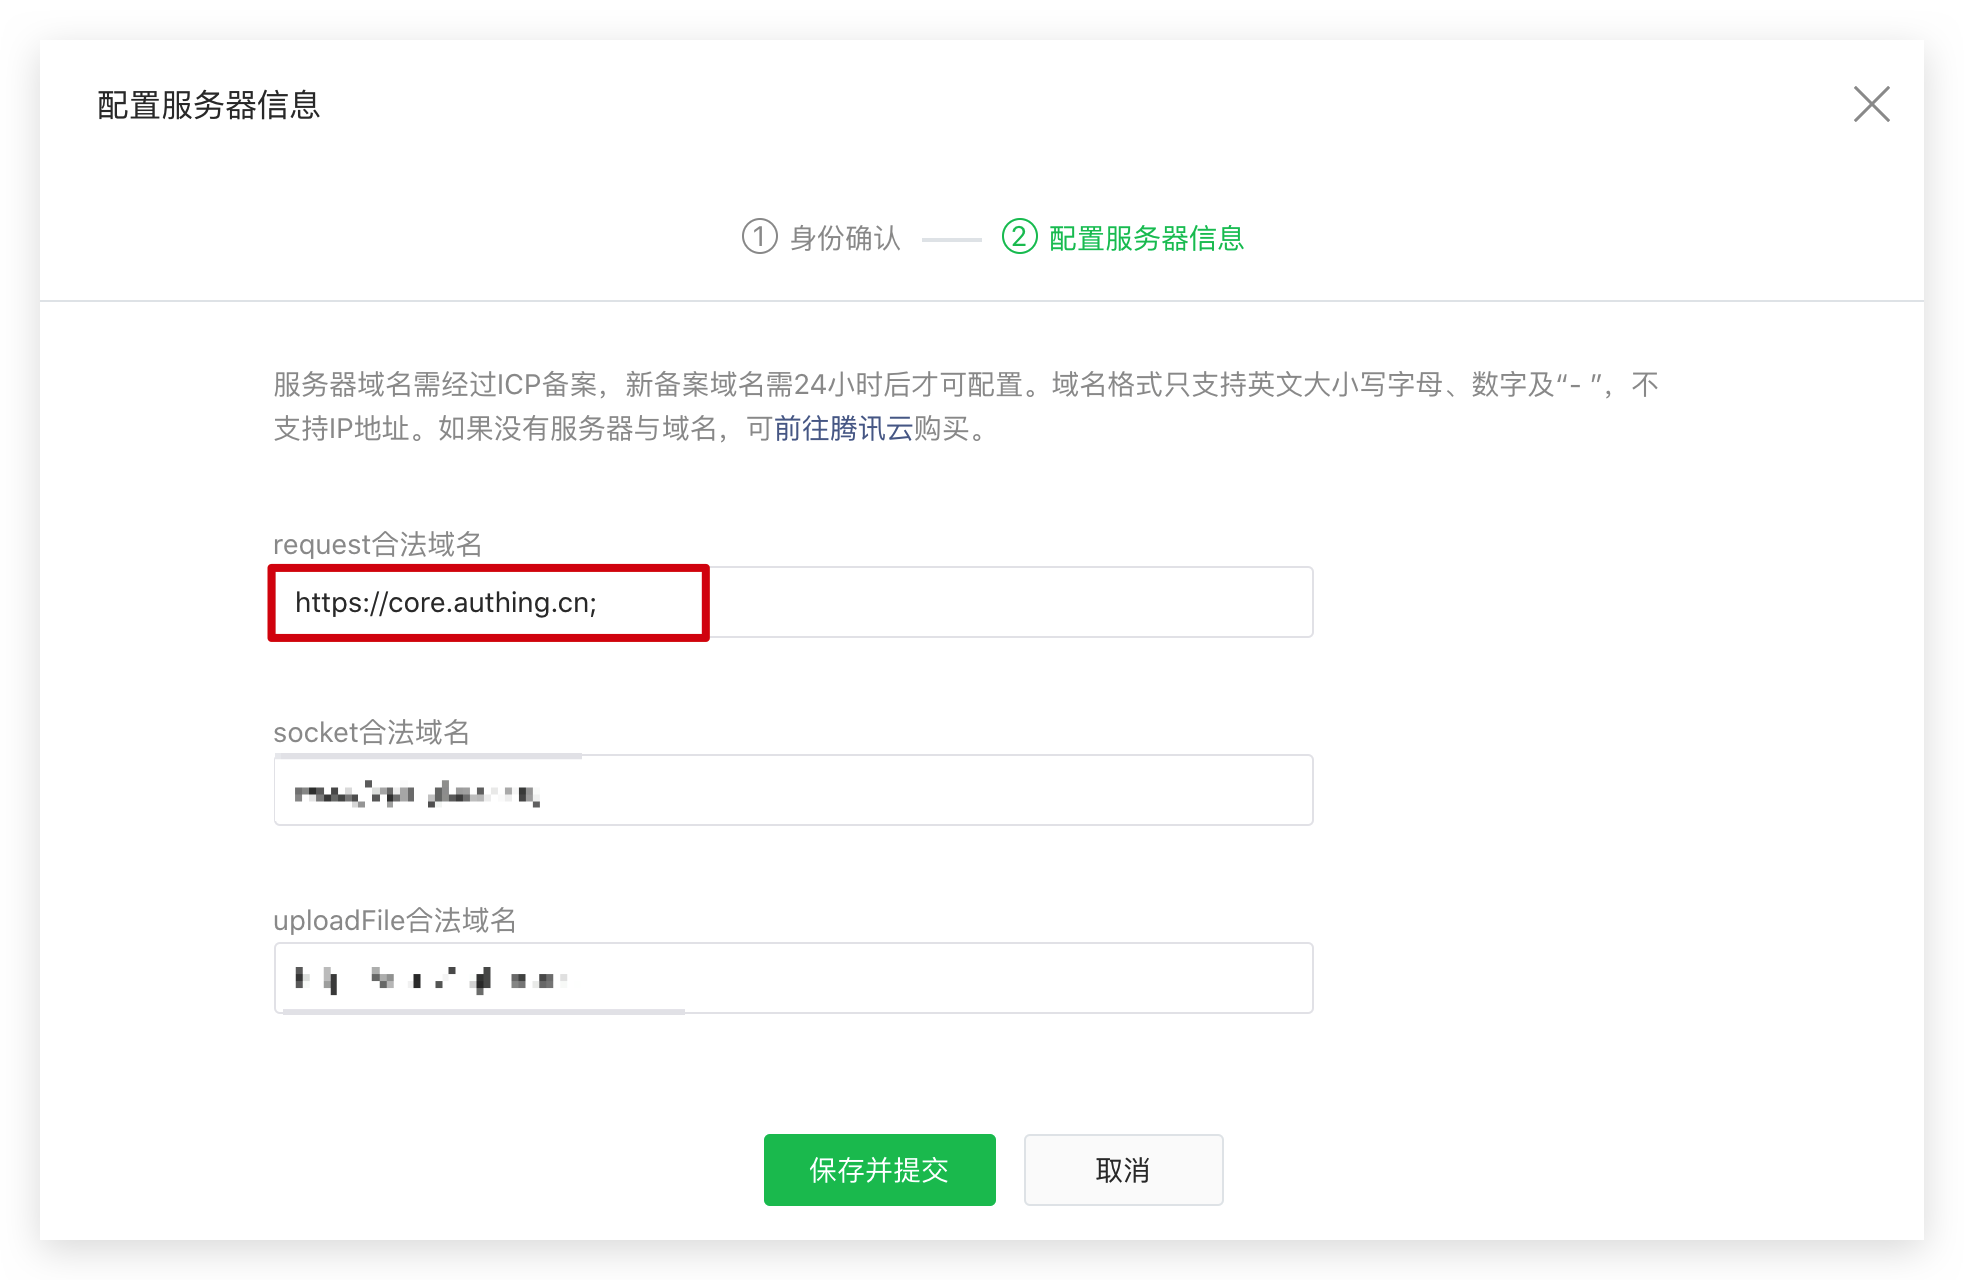
-Add
core.authing.cnto WeChat's request legal domain name:
- In the Authing console (opens new window), open the WeChat applet social login.
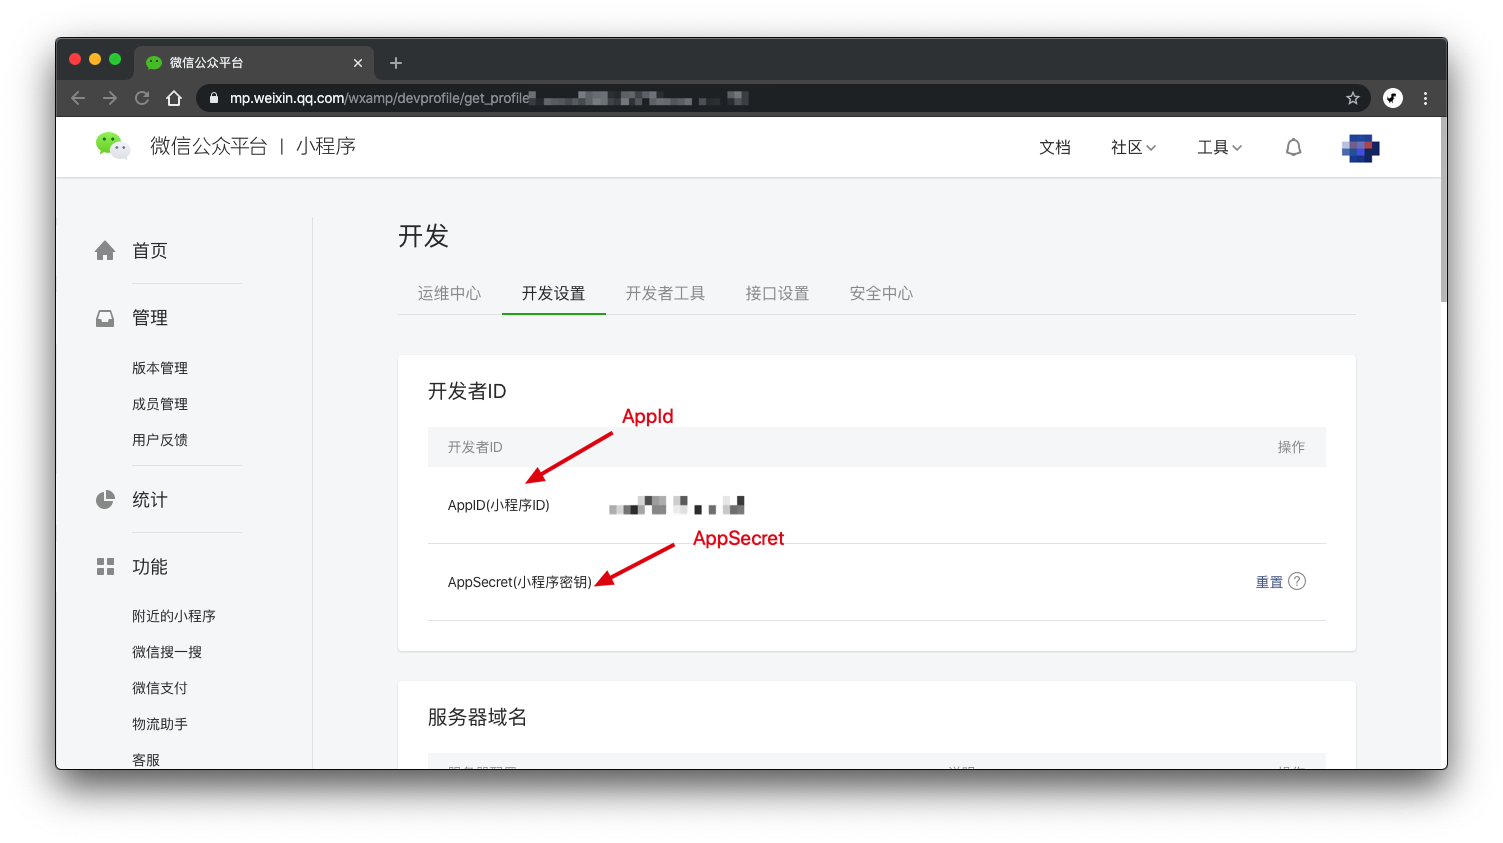
-Get AppId and AppSecret of WeChat Mini Program
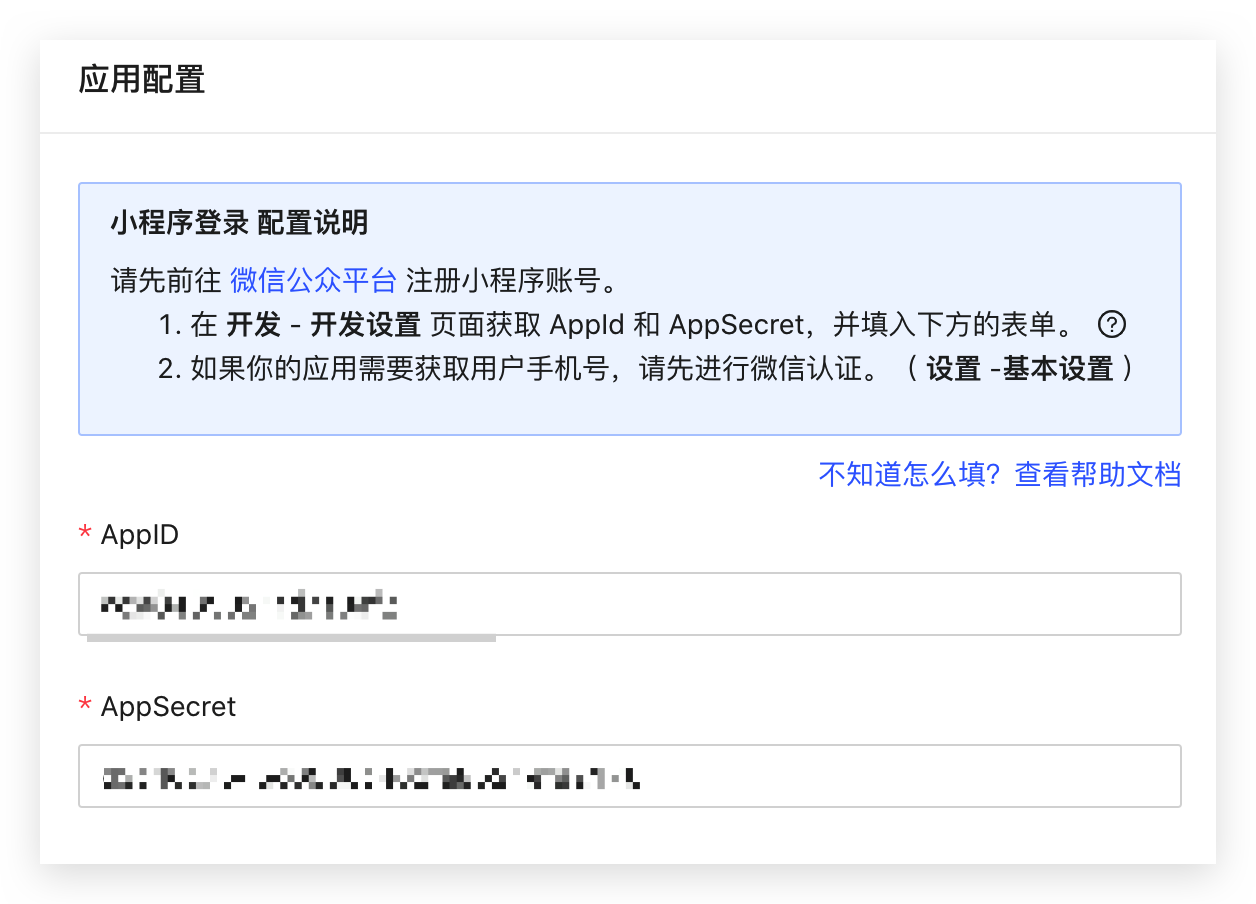
-Go to Authing Console (opens new window) Connect to Identity Source-Social Login-Login in Mini Program:

-Fill in the AppId and AppSecret of the applet, and click Save.
# Installation
Starting from Mini Program Basic Library version 2.2.1 or above, and Developer Tools 1.02.1808300 or above, the Mini Program supports the use of npm to install third-party packages. For details, please see: [npm Support | WeChat Open Document](https://developers .weixin.qq.com/miniprogram/dev/devtools/npm.html).
# Install npm package
Use npm:
npm install authing-wxapp-sdk
Use yarn:
yarn add authing-wxapp-sdk
# Build npm in Mini Program Developer Tools
Click the menu bar in the developer tools: Tools --> Build npm:

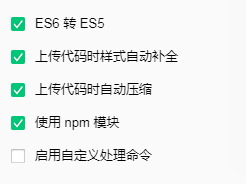
Check the Use npm module option:
# Initialization
AuthenticationClient needs to pass in the user pool ID (userPoolId):
You can learn about How to get UserPoolId (opens new window) here. If you are not familiar with the concept of user pool, you can click here Understand the core concept of Authing system (opens new window).
const {AuthenticationClient} = require("authing-wxapp-sdk")

const authing = new AuthenticationClient({
  userPoolId: "YOUR_USERPOOL_ID",
})
The complete parameter list is as follows:
userPoolId: User pool ID.accessToken: Initialize the SDK with the user's token.timeout: Request timeout time, in milliseconds, the default is 10000 (10 seconds).onError: Error handling function, you can use it to globally catch all exceptions requested by the Authing client. The function is defined as:
(code: number, message: string, data: any) => void
For the complete error code, please see this document (opens new window).
host: Authing server address. If you are using the public cloud version, please ignore the parameter. If you are using a privatized deployment version, this parameter is required. The format is as follows:https://authing-api.mydomain.com, without/at the end.
# Instructions
After the user logs in, the SDK will write the user's token to WeChat's Storage, and subsequent requests will automatically carry the token for access.

const {code} = await wx.login()
// No user authorization required
const user = await authing.loginByCode(code); // Successful login, write token to WeChat Storage

// You can do this after logging in
await authing.updateProfile(
  nickname:'Bob'
)
Subsequent users open the applet again, and if the user's token is stored in the applet's Storage, the request to access authing will automatically carry the token.
// The request can be successful because the user is logged in.
await authing.updateProfile(
  nickname:'Mick'
)
# API Reference
You can use all the methods in
authing-js-sdkAuthenticationClient (opens new window), call methods andauthing- js-sdkis exactly the same.
# loginByCode
Use WeChat authorized method to log in.
-If the user logs in in the Mini Program for the first time, and the user has not logged in with the WeChat application that is bound to the Mini Program with the same principal, a new account will be created. -If the user logs in in the Mini Program for the first time, but the user has logged in using the WeChat application that is bound to the Mini Program with the same subject, the corresponding WeChat account will be returned.
# Parameters
code: Call thecodeobtained by calling wx.login() (opens new window), No user authorization is required. Required.options: Optional.options.iv: WeChat Button component (opens new window) withopen-typeasgetUserInfoiv.ivandencryptedDatamust be passed at the same time, Authing Server will try to encrypt user data fromivandencryptedData`. User manual authorization is required for the first time. Optional.options.encryptedData: WeChat Button component (opens new window) withopen-typeasgetUserInfoencryptedData.ivandencryptedDatamust be passed at the same time, Authing Server will try to encrypt user data fromivandencryptedData`. User manual authorization is required for the first time. Optional.options.rawData: WeChat Button component (opens new window) withopen-typeasgetUserInforawData. Choose eitheriv+encryptedData. IfrawData` is passed, Authing Server will directly use the data as the user's profile. User manual authorization is required for the first time. Optional.
# Example
- Silent authorization
The nickname and avatar in the profile of the user who registered for the first time will be empty, because the user's avatar and nickname have not been obtained.
const {code} = await wx.login()
const data = await authing.loginByCode(code)
- The user manually authorizes to obtain the nickname avatar
Authorization is only required for the first time. After authorization, the user can use
wx.getUserInfoto directly obtain the avatar nickname.
-Request user manual authorization for the first time
<button open-type="getUserInfo" bindgetuserinfo="getUserInfo"> Get avatar nickname </button>
getUserInfo: async function (e) {
  const {code} = await wx.login()
  const {rawData} = e.detail
  const user = await authing.loginByCode(code, {rawData })

  // Or pass iv encryptedData
  // const {iv, encryptedData} = e.detail
  // const user = await authing.loginByCode(code, {iv, encryptedData })

  console.log(user)
}
-Later it can be automatically obtained through wx.getUserInfo
const {rawData} = await wx.getUserInfo()
const user = await authing.loginByCode(code, {rawData })
// Or pass iv encryptedData
// const {iv, encryptedData} = e.detail
// const user = await authing.loginByCode(code, {iv, encryptedData })
# loginByPhone
Log in through WeChat mobile phone number authorization. Each call requires manual authorization by the user.
-If the mobile phone number is registered for the first time, it will be bound to the WeChat account (it will be created if it does not exist). -If the phone number has been registered before, the account corresponding to the phone number will be returned, and the phone number will be bound to the current WeChat account.
# Parameters
code: Call thecodeobtained by calling wx.login() (opens new window), No user authorization is required. Required.iv: WeChat Button component (opens new window) withopen-typeasgetPhoneNumberofivreturned by the click event . Required.encryptedData: WeChat Button component (opens new window) withopen-typeasgetPhoneNumber.encryptedDatareturned by the click event . Required.
# Example
<button open-type="getPhoneNumber" bindgetphonenumber="getPhone"> Get phone number </button>
getPhone: async function(e) {
  const {code} = await wx.login()
  const {iv, encryptedData} = e.detail
  const data = await authing.loginByPhone(code, iv, encryptedData)
  console.log(data)
}
# getPhone
Get the mobile phone number of the current user (the phone number will not be used to register or bind the account)
# Parameters
code: Call thecodeobtained by calling wx.login() (opens new window), No user authorization is required. Required.iv: WeChat Button component (opens new window) withopen-typeasgetPhoneNumberofivreturned by the click event . Required.encryptedData: WeChat Button component (opens new window) withopen-typeasgetPhoneNumber.encryptedDatareturned by the click event . Required.
# Example
<button open-type="getPhoneNumber" bindgetphonenumber="getPhone"> Get phone number </button>
getPhone: async function(e) {
  const {code} = await wx.login()
  const {iv, encryptedData} = e.detail
  const data = await authing.getPhone(code, iv, encryptedData)
  console.log(data)
}
Example of returned data:
{
  "countryCode": "86",
  "phoneNumber": "176xxxx6754",
  "purePhoneNumber": "176xxxx6754",
  "openid": "o1p9H4wAgb9uTqpxG5Z1g0pIr3FE",
  "unionid": "o0pqE6Fbr5M-exSu_PeL_sjwN44U"
}
# updateAvatar
Update the user profile picture, this method will automatically call
wx.chooseImageto get the image and upload it to the cdn of Authing. It only needs one line of code to call.
# Example
const {photo} = await authing.updateAvatar()
console.log(photo)
# Best Practices
We recommend that the user use loginByCode to obtain the Authing account corresponding to the applet account when using the applet for the first time. If the account is bound to a mobile phone number before, there is no need to request the user to authorize the phone number again. If the account is not bound to a mobile phone number, call the loginByPhone method to request the user to authorize the mobile phone number.
After the user logs in, the authing-wxapp-sdk will write the token into the Storage of the applet, you can call authing.checkLoginStatus() to determine whether the user's token is valid, and restart it when the token is invalid log in.
# Error handling
You can use try catch for error handling:
try {
  const user = await authing.loginByEmail('test@example.com','passw0rd')
} catch (error) {
  console.log(error.code); // 2004
  console.log(error.message); // user does not exist
}
For the complete error code, please see this document (opens new window).
You can also specify onError to uniformly capture all Authing request exceptions, such as using WeChat components such as wx.showModal to display error prompts.
const authing = new AuthenticationClient({
  userPoolId,
  onError: (code, message) => {
    wx.showModal({
      content: message,
      showCancel: false
    })
  }
})
# Contributors ✨
Thanks goes to these wonderful people (emoji key (opens new window)):
 liaochangjiang |  leinue |  Meeken1998 |  vincentCheng |
# Get help
Join us on Gitter: #authing-chat (opens new window)